

 by
by Are you tired of intrusive ads and concerned about online privacy? Enhance your home network’s security and enjoy an ad-free browsing experience with Pi-hole, a network-wide ad blocker. This lightweight software can be set up on a variety of devices, including Virtual Machines, old laptops, or a Raspberry Pi. Follow this guide to get Pi-hole up and running in under 5 minutes!
What is Pi-hole?
Pi-hole is a Linux network-level advertisement and internet tracker blocking application which acts as a DNS sinkhole (and optionally a DHCP server), intended for use on a private network. It’s designed to block ads for all devices on your network by default, ensuring a faster and more secure browsing experience.
Why Choose Pi-hole?
- Network-Wide Protection: Unlike traditional ad blockers that work on individual devices, Pi-hole provides protection for your entire network.
- Privacy-First: Pi-hole helps enhance your online privacy by blocking unwanted trackers.
- Improved Browsing Speed: Enjoy faster browsing speeds as ads and trackers are blocked before they load.
- Customizable: Tailor the blocking to your needs by adding or removing websites from your blacklist/whitelist.
Step 1: Choose Your Hardware
You can install Pi-hole on any of the following:
- Virtual Machine: Leverage software like VirtualBox or VMWare to run Pi-hole in a virtualized environment.
- Old Laptop: Repurpose an old laptop as a dedicated Pi-hole server.
- Raspberry Pi: A popular choice due to its low cost and energy efficiency.
Step 2: Install Pi-hole
- For Raspberry Pi:
- Download the Pi-hole software from the official website.
- Flash the software onto your SD card using a tool like balenaEtcher.
- Insert the SD card into your Raspberry Pi and boot it up.
- Follow the on-screen instructions to complete the setup.
- For Virtual Machine/Old Laptop:
- Install a Linux distribution (like Ubuntu) on your device.
- Open the terminal and run the following command:
curl -sSL https://install.pi-hole.net | bash - The installation script will guide you through the process.
Step 3: Configure Your Network
- Access the Pi-hole admin interface through the IP address provided at the end of the installation.
- Set your router’s DNS server to the Pi-hole’s IP address. This will direct all traffic through Pi-hole.
- Alternatively, manually set the DNS server on individual devices if you don’t want to filter ads network-wide.
Step 4: Enjoy an Ad-Free Experience!
Once you’ve set up and configured Pi-hole, you’ll start to notice the absence of ads across all devices on your network. Enjoy faster, more secure browsing and take control of your online experience!
Tips for Maintaining Pi-hole:
- Regularly Update: Keep Pi-hole up-to-date to ensure optimal performance and security.
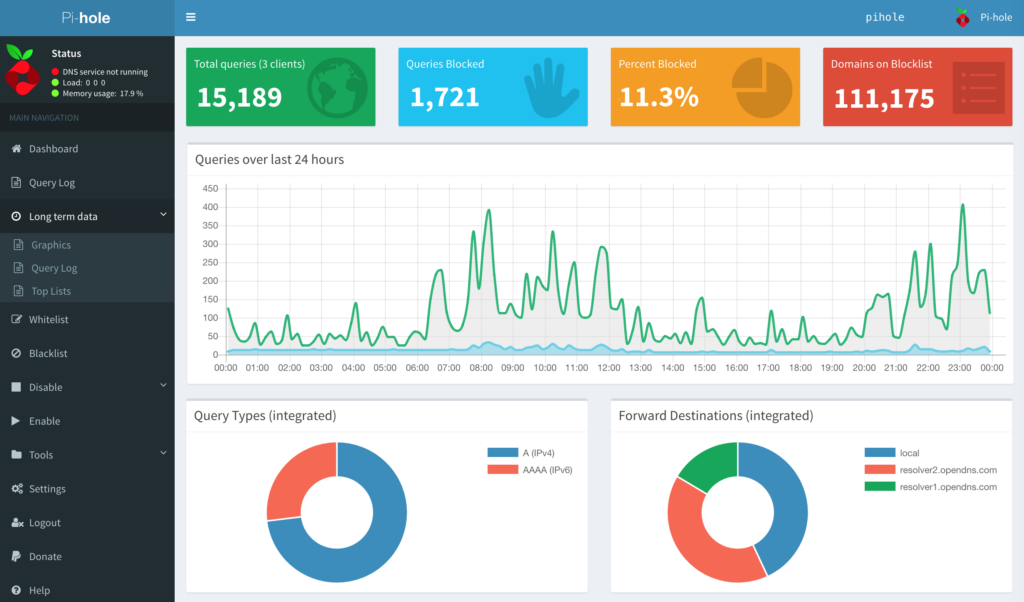
- Monitor Queries: Use the dashboard to monitor queries and spot any unusual activity.
- Customize Your Lists: Tailor your blocklists and whitelists to suit your browsing needs.
Pi-hole is a powerful tool that not only blocks annoying ads but also enhances your network’s security. With this simple setup, you can say goodbye to ads and hello to a smoother, more secure browsing experience. Protect your network in minutes with Pi-hole!
Remember to customize the installation steps based on the device you’re using and always check the official Pi-hole documentation for the most up-to-date information. Happy ad-blocking!
For more tech tips and guides, keep visiting arvindgaba.com.